Feeds:
Posts
Comments
Dundas Square, Planetized

Dundas Square, Planetized

To skip right to the tutorial for little planets with Planetizer, click here.

In 2008 I wrote a blog entry, later transformed into a flickr entry, on how to do HDR Panoramas. Next I wished to write a tutorial about how to make tiny planets from these panoramas. I found some tutorials, and started doing it, but I found that many times, when the panoramas were big and nice, the methods were slow or unresponsive (programs froze, etc) on a pretty solid computer. Also, most methods involved Photoshop and/or Flexify, which are expensive, although some involved GIMP (free) :).  To avoid most of these problems, I started writing a script, now called Planetizer, that will, with just a couple of clicks, take a panorama and transform it to a little planet 🙂 You can find the link, with the download and tutorial, here. Its completely free :).

Enjoy 🙂

Toronto City Hall (HDR Panorama)

Toronto City Hall (HDR Panorama)


Update 1I created a (hopefully better) version of this Tutorial on flickr, here! The previous tutorial has been erased in favour of this one.

Update 2: I have recently written a program to transform your HDR panoramas (and other images) into small planetsPlanetizer


with Planetizer

Dundas Square Tiny Planet: with Planetizer


Stumble It!

While photoshop is the tool of choice (ok, that’s debatable, but it *seems* to have a majority win) for touching up your photos, there may well be times (most of?) when you don’t want to unleash this monster of a program on your pics, but would rather touch them up fast and send them to your friends/flickr/stock/whatever. I’ll talk a little about the lightweight Adobe Lightroom. Keep in mind that while I have some decent experience with photoshop and other similar programs, I’d quickly put myself in the amateur category. This will be, then, a small guide to the quick things you can do to improve you photos with Lighroom, with more detailed tutorials to come as I learn 🙂

So I’ve recently installed Lightroom 1.4.1 (as well as Camera Raw 4.4.1 in Photoshop). You will need this version if you want to use it with the Canon Rebel XSi / Canon EOS 450D raw files.

Lightroom can act as an organizer of your photos, but I’ve mostly used in its ‘develop’ mode, where one has quick access to the usual editing tools, some or most of which you might find in other (mostly raw-editing) programs, but not, I believe, with as much ease and “smoothness”. Lightroom will not, I believe, actually edit your image files (jpegs or raw, etc), but rather will store the modifications you’ve done by itself and allow you to export the resulting image. This might be cumbersome if all you want is a quick edit to your jpeg, but it comes in handy for more involved work.

Quick Tools

So for starters, after you open up Lightroom and import a picture, you will see a basic toolset, including Colour temperature and Tint, White Balance control; Exposure, brightness and Contrast; and clarity vibrance and saturation. Depending on your photo-editing level, that might be a mouthful or just the starting toolset, however these tools can quickly “upgrade” an image. For example, increasing vibrance and saturation will tend to create livelier colours, and increasing the clarity will.. do just that, at the expense of some possible salt-and-pepper noise. The other tools are just as self explanatory.

Let us present a concrete example:

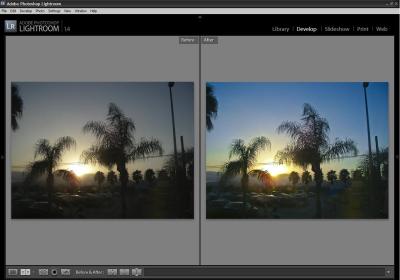
Using the before an after views in Adobe Lightroom, we touch a little bit on each of the basic tools, first with the vibrance and saturation, and then in the more complex tools with the green luminescence & saturation.
This gives us the results below!

Comparison

Part II to follow soon!

University College Side ViewSoon after exams finished, we took our faithful Canon Rebel XSi for a night walk through the University of Toronto Campus, and took several pictures for creation of some High Dynamic Range (HDR) images. (For an Introduction to the HDR concept, you could see, for example, the wikipedia description.) We wanted to do some HDR photography before we read and learn more about it, so that we could see how our HDR compositions will evolve as we learn. So this is sort of the ‘before’ experiments.

We knew, pretty much, only the basics

  • We need several exposures, so that we may capture information in both the really light and really dark areas of the subject, which will then be layered together.
  • We need (most of the time) a semi-static subject (and hence camera), so that it is the fixed, or at least align-able, in the (different exposure) pictures. Thus, a good tripod is useful. Any vibrations in the camera or subject are problematic.

Some things we noticed while taking the photos

  • Outdoor HDR can be problematic when wind or other vibration sources are present and the subject/camera is susceptible. For example, the trees will shake in the wind, creating a difference in between the various exposure pictures, or blurriness in large exposure pictures. Sometimes, this is fixable with various algorithms (provided with various HDR packages), however sometimes they are not. A large aperture lens would also help, requiring less time for a large exposure.
  • A remote release can be helpful in sensitive conditions to avoid even the smallest vibrations when taking the shot. A way to get around this is to use the 2-second delay (or 10-second, if you have no 2-sec).

Combining the Photos

To combine the images of a certain scene into one HDR picture, we experimented with Photoshop CS3 and Photomatix 3.0. To create a visually pleasing image, both will undergo HDR algorithms and then allow you to perform post-processing steps, with more or less flexibility. As expected by the nature of the software, Photoshop will be more powerful and flexible, but harder to understand and some reading or play-hours will need to be invested. The potential, we suspect, is to get better HDR pictures than Photomatix, however that is by no means confirmed anywhere. Photomatix is simple and straight-forward, and provides a ton of clear tonemapping setting after the HDR process. We used photomatix in the trial version, where although all features are included it is claimed that certain watermarks may appear in the final image, depending on your settings. For some odd reason, we never ran into this issue.

Overall, in the relatively short time we experimented with our pictures, we ended up getting far better results with photomatix, and continues with this process. Until we read/understand more about the roots fo the process of HDR and tonemapping, photomatix seems the simpler choice, with better results

We also noticed, in experiments where a large number of exposures were present (though this might not ever be necessary – it would seem that 3-5 exposures will be enough), photomatix will process the images smoothly, whereas Photoshop CS3 may freeze/slow down severly. (We ran our tests on a dual-core E6550 2.33Ghs, 4GB ram (3.25 detected)).

To give a taste of the results, with the disclaimer that certainly the time we spent on this was limited compared to what can be spent, here is a view of the UofT annex HDR-ed with Photoshop, to the best of our trials:

and here is the best we got with Photomatix:

(click on either for larger views – via flickr)

The next steps in the HDR game is to read, play with the camera and software, and understand the process better. Once we reach some sort of milestone, we’ll take a similar trip and detail our learnings 🙂

For a taste of our results, see our flickr HDR set, among the first images.

Lamborghini Murcielago in YorkvilleTo inaugurate our Canon Rebel XSi, we took pictures on walks around the Annex-Yorkville area of Toronto (Ont, CA). This will be a first stage in our exploration of the camera’s abilities :). You can see pictures from these trials here. Hopefully, the pictures will get better as you keep rechecking this set 🙂

Some simple findings in our first walks:

  • First off, a lens hood may really help in full-daylight situations. (Canon doesn’t supply lens hoods on its normal (non-L series) lenses, and at the time we purchased the XSi they didn’t have a lens hood for the 18-55 EF-S kit lens). However you can see that on some images sun glare can present a problem.
  • Using the Basic Zone settings (settings on the main dial below (and including) the auto- sign) configure settings on the camera that end up taking solid, safe photos with pretty good colour temperature, shadows and exposures. As somewhat expected, the camera takes good pictures even with minimal effort.
  • The Auto Focus tends to focus on the closest object, and does so relatively fast and precise. The manual focus works nicely too (see the simple, somewhat cliché’d pictures of the pear tree).
  • The 18-55mm kit lens is quite limiting in terms of focal length. The need for a telephoto lens becomes quickly apparent.

When choosing my entry-level DSLR, I decided to go for something I could learn from/with rather than achieve a certain kind of perfect shot. The road to the 450D started with a look at the Camera stats in Flickr (Perhaps not the most informative, but it gives you an idea of what is currently being used and how).

At the time, the most popular by far was the Canon Rebel XTi (400D), followed by its predecessor the Rebel XT (350D). Here’s the data on May 13th, 08:

I read into the XTi and finally discovered the XSi as its successor with several improvements, all well received. A comprehensive review, for example, together with a video can be found at CameraLabs.

Some improvements over the XTi:

  • 12 Megapixels versus XTi’s 10
  • 3 inch LCD vs XTi’s 2.5
  • LiveView option – viewing the subject through the LCD if you wish
  • The default lens comes with Image Stabilization

These seem to be the main changes. Overall, one has to decide whether these features are worthwhile improvements for the price difference or an upgrade. We decided to go with the XSi since it was our first camera, and the slight differences seemed worthwhile.

Here’s a few detailed reviews to get you started:

And here’s a link directly to Canon’s Rebel XSi website, where a nice tour and specs are provided.

Welcome, Spring

Spring

Spring is here!
In this blog we’ll detail our adventures with our new Canon EOS 450D (Rebel XSi in North America). For now, we’re still testing out blogger and wordpress workability for the blog. We’ll talk about the picture we’ve taken and things we learn, and hopefully include short tutorials for starting photographers, tuned to using the Canon XSi (or its sisters the XTi and XT), based on our experience. Lets see what comes out 🙂